Pages

Showing posts with label stockings. Show all posts

Monday, November 19, 2012

Monday

I cannot even believe the response to the happy trees mini! Friday, Sew Mama Sew posted the project in a collection post, and over the weekend, it got tons of views. How exciting!

I had a busy week, although I didn't end up working on all of the items I mentioned last week.
I have the x & + bug.

x & + blocks

I now have fifteen blocks! I've been cutting for them as I cut for other projects. They are so fun to make.

Another postage stamp pillow

I finished the top for that postage stamp pillow I mentioned last week.

Happy Drawing stuffed animals

On a whim, I cut into my Happy Drawing panel and stitched up these fun little stuffed animals for Mr. Oliver.
I think they will be a fun gift for him!
I intend to stitch up a few extras.

Eric's stocking

I'm also working on a set of stockings for a custom order. I really love these fabrics together! I'm using my tutorial found here.

Just finished

In knitting news, I finished a shawl on Saturday, and started a hat!

Starting

I haven't blocked the shawl yet, but I hope to do so soon. And the hat is about halfway done already! I love how fast a hat can happen.

I probably won't be back in this space until the weekend.

For those of you in the states, have a very happy thanksgiving! And for the rest of the world, have a wonderful week! <3

Thursday, October 18, 2012

HCB: Scrappy Stocking Tutorial

Hello, hello! I am the caboose of the Holiday Craft Bash!

I hope you've checked out the other stocking projects this week, at Olivia Jane Handcrafted, A Little Gray and Esch House Quilts.

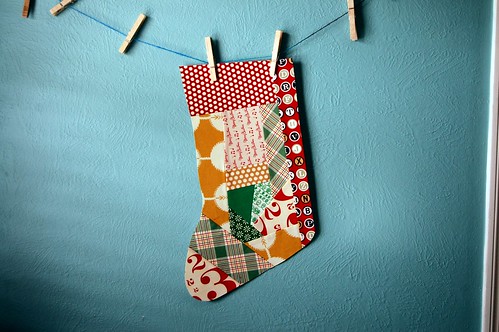
Today, I'm going to share a scrappy stocking tutorial.

All seams are 1/2" unless otherwise noted!

List of materials:

-1/2 yard fabric for lining
-1/2 yard fusible interfacing (I recommend SF101 or SF911)
-scraps
-one fat quarter of coordinating fabric

Directions:

LINING

1) Trace an existing stocking onto paper for your template. If you need a template, please email me at parandroid7 at gmail dot com, and I can send you mine. My template is approximately 11" x 18".

2)With lining fabric folded in half, trace and cut your template (you will have two mirrored pieces).

3) Sew lining pieces right sides together.

4) Clip the curves of the stocking, no more than 1" between cuts. Be careful not to cut your seam!

EXTERIOR

5) Sew scraps together to form patchwork of approximately 11" x 18".
Don't be afraid to trim as you go, and give it some wonkiness!

6) Apply fusible interfacing to wrong side of your patchwork. Cut template from patchwork.

7) Apply interfacing to wrong side of fat quarter of fabric. Cut template from fat quarter, making sure that it is the mirror image of your patchwork piece.

8)Sew exterior pieces, with right sides together. Again, clip your curves!

CUFF

9)Cut a scrap or solid piece of fabric 15" x 10.5". Fold in half (lengthwise) with wrong sides together.

10)Fold in half (widthwise), and sew together.

HANGER

11) Cut 4" x 10" piece of fabric. Fold in half (lengthwise) with wrong sides together.

12)Sew and turn right side out. Press with seam at center of back.

ONE-STEP ASSEMBLY

13) Insert lining into exterior stocking, with wrong sides together (right side of lining should be visible inside).
Insert hanger on inside of lining, folded in half (widthwise), being sure to place it on the back of the stocking, opposite of the toe area (imagine how it will hang).
The hanger should align (raw edges) with top of stocking.
Finally, place cuff inside lining, making sure strap is between lining and cuff.
**And very important (from my lessons learned!), the cuff seam should be visible on the inside, so that it will be hidden when you finish!).


14)Pin and sew around the top of the stocking.

Flip cuff and hanger out and press.

And you're done! Enjoy your new stocking!

If you make a project using one of our Holiday Craft Bash tutorials, please add it to the flickr group! You could win a weekly prize if you do!

Monday, November 28, 2011

FO: Stockings for Jill and Ryan

Whew! What a nice long weekend! For those of you in the states, I hope you had a nice Thanksgiving with your families. I got a lot of time with my family and Elliott's. And yes, I'm engaged! I don't have any details to share on the when or how, but we know it will be sometime next year! For now, I'm just enjoying the feeling. I'll share more with you soon!

In the meantime, I crossed a couple of things off of my gifty list this weekend.

My sister asked me for Christmas stockings, personalized for her and her boyfriend, Ryan. Using Fabricworm's tutorial and some Alexander Henry Holiday Hoot fabric, I came up with some pretty fun stockings!

FO: Owl-y Stockings

I worked on the embroidery over the holiday, and finished them up yesterday afternoon.

Embroidery for stockings

It's always fun to stitch up words in embroidery. And of course, Bella always likes to help.

The pattern was very easy to follow, and the second one came together better than the first.

I'm linking up today with Megan this morning!

{Sew} Modern Monday at Canoe Ridge Creations
Related Posts with Thumbnails