Pages

Showing posts with label tutorial. Show all posts

Thursday, September 12, 2013

Cafe Curtain Tutorial

Hello, hello!

I am popping in today to share a tutorial I recently wrote for FreeSpirit, as part of National Sewing Month. You can find my cafe curtain tutorial here, over on the FreeSpirit Fabric blog.

I was able to use two prints from Erin McMorris' line, Astrid.

And even better, FreeSpirit was kind of enough to send me a little extra for one of you!
Just leave a comment here and you can win a half yard of each of these two Astrid prints!
Please be sure I have a way to contact you, and for this giveaway, US entries only, please!

I will pick a winner Monday!

I really like this curtain, and I hope you do, too!

ETA: Comments are now closed. Thanks!

Monday, December 17, 2012

Holiday Craft Bash: Wrap up

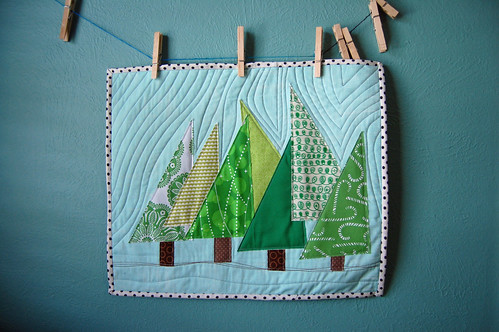
FO: Happy Trees Mini Quilt

Good morning! I hope that the tutorials shared during the Holiday Craft Bash have helped get your house holiday-ready! I had so much fun sharing with you. It was certainly challenging and there were a couple of stressful moments, but overall, it was a great experience. I learned a lot, and I am so happy I was able to work with Meredith, Jessica and Debbie!

To recap, here's a list of the tutorials provided:

Debbie's projects
Scrappy Classic Stocking
Joy Centerpiece
Randot Table Runner
Winter Night Pillow
Christmas Tree Farm
North Pole Tree Skirt

Jessica's projects
Abominable Snowman Stocking
Leg Lamp Pillow
Frosty Advent Calendar
Grinch Placemats
Buddy the Elf tree skirt
Charlie Brown ornaments

Meredith's projects
Flowering Pleats Pillow
Vintage Embroidered Tree Skirt
Christmas Table Runner
Santa Canvas Wall Hanging
Christmas Tree Coasters
Embroidered Stocking

My projects
Scrappy Stocking
Hexagon Tree Skirt
Christmas Plus Pillow
Zig Zag Table Runner
Embroidered Gift Tags
Happy Trees Mini Quilt

Thanks for playing along with us! As a grand finale, some pretty awesome final prizes have been arranged! There are two grand prizes. First, you could win a fat quarter bundle with ELEVEN prints of Kate Spain's Cuzco line!

This prize is courtesy of Sewn Studio.

The second prize, from Anna Maria Horner, is a THIRTEEN-pattern collection.

Lovely prizes, yes??

To enter, share a project you've made from one or more of our tutorials over in the flickr group! That's it! Each project is a separate entry, so get to making!

Meredith will draw two winners this Friday, December 21st.

Good luck, friends!

Thursday, November 29, 2012

HCB: Zig Zag Table Runner Tutorial

And here we are. The last Holiday Craft Bash tutorial!

Today, I've got a Zig Zag Table Runner for you. This was almost the tree skirt, but I felt it would be better suited for a table than under the tree.

Directions below are for 1/4" seam, unless otherwise noted.

List of materials:

-1 charm pack (or forty 5 inch squares)
-1/2 yard of coordinating solid
-1 yard of backing fabric
-FQ of binding fabric
-batting
-60 degree triangle template

Directions:

1)Sew charms into pairs.

2)Next, sew the pairs into four-patches. (if you are using a charm pack, remove two squares). You should have ten four-patches.

3)Cut your solid fabric into 8 1/2" strips along WOF.

4)Now, using your triangle template (you can get one here!), cut eleven triangles from your solid fabric.

5) Again, using your template, cut a triangle from each four-patch. Consider rotating your template over the fabric, to get a different arrangement of the fabrics.

6) Alternating solid and scrappy triangles, sew three rows of triangles.

Each row should have seven triangles, and two rows should start/end with a solid piece.

7) Sew these three strips together, with a solid-start strip on either side of the scrappy-start strip. You will have jagged ends!

8) Now, we'll square up our short ends.

9) Cut your backing fabric slightly larger than the front.

10) Baste!

11) Quilt as desired. I chose to quilt the scrappy triangles in a free motion loop and the solid portions in "organic" zig zags.

12) Trim your quilt square. Make your binding.

As usual, I used a 2 1/2" wide binding.

13) Apply your binding.

Finished!

Thanks for checking out the Holiday Craft Bash tutorials, and thanks especially to Meredith, for inviting me to contribute! It was a challenge, but very fun!

And be sure to check out the last tutorials from Jessica, Debbie and Meredith this week! Please make sure you add any finished projects to the flickr group!

Thursday, November 15, 2012

HCB: Happy Trees Mini Quilt

Hello, hello. I cannot believe how fast November is flying by! Here we are, nearing the end of our Holiday Craft Bash.

Today, I've got a little mini quilt tutorial for you. This little mini definitely gives me a Bob Ross vibe.

When I was planning my project for this week, I wanted to use some of the scraps generated by my Hexagon Tree Skirt.

List of materials:
fabric scraps, cut into triangle shapes
Fusible interfacing (I use Pellon SF 101)
Batting (approx. FQ size)
Fat quarter of background fabric
fat quarter of backing fabric
1/4" yard of binding fabric
small scraps for tree trunks
Basting spray I use the June Taylor brand, found at Joann) or safety pins

Directions

1) Iron interfacing to wrong side of tree and tree trunk pieces. I laid mine out on a strip and ironed all at once. Just make sure you don't iron directly on the interfacing!

2) Cut out all pieces.

3) Baste your background fabric to your batting.

4) Plan your layout. Make sure you work with at least a 2" border, and lay out the trees in a desirable fashion.
At this point, it's helpful to take a picture of your layout!

5) Pin your first tree (starting with the trunk if applicable) to the background. Using a walking foot (if you have one), topstitch the trunk and tree to the background. You can use decorative stitches if desired.

6) Continuing with the remaining tree pieces, applique your happy trees.

I went out of order with some of my trees, to create a little interest.

7)Once you have appliqued all of your trees, create a ground level with a few lines of quilting. I used brown thread for this, but feel free to use whatever feels right! You could use white for snow, perhaps. But in Texas, the ground is brown in the winter.

8) Now, we need to attach our backing fabric. Baste the back fabric to the other side of the batting.

9) Now, quilt around the trees! You could choose to quilt over them, but I like the effect of quilting around them.
I tried to create some movement with wavy lines. Have fun with this!

10) When you are satisfied with your quilting, trim your mini down to the desired size. My mini is 16" x 19". Make sure you leave at least an inch border, so your trees don't get covered up by the binding!

11) Make binding. I used 2 1/2" binding with a 3/8" seam allowance.

Apply your binding to the front of the quilt using your machine.

12)Apply your binding to the second side. I adore the hand sewing process on the second side, but you can surely apply it by machine if that's your thing!

13)Admire your forest of happy trees!

Please be sure to check out the other tutorials from this week!

Debbie and I were thinking along the same lines. Check out her Christmas Tree Farm mini!

Meredith is sharing her santa canvas (that you might recognize from our graphic!), and Jessica made a Frosty Advent Calendar! As always, if you make something from our tutorials, please add it to the Holiday Craft Bash flickr group!

We're taking a break for the Thanksgiving holiday next week, but I'll have my last installment up the following Thursday!

Thursday, November 8, 2012

HCB: Embroidered Gift Tags Tutorial

Well, it's week four of the Holiday Craft Bash!

This week's topic was open for interpretation, and I chose to make a pile of embroidered gift tags! Be sure to check out the adorable Charlie Brown ornaments that Jessica made! You can also make a lovely table topper via Debbie and some super cute Christmas tree coasters over at Meredith's blog! As always, please add any projects you make to the flickr group for a chance at the weekly prize!


List of materials:
Linen scraps (I use Essex linen)
Scraps of fabric
Fusible interfacing (scraps are okay!), I use Pellon SF 101
Water-soluble pen
Perle cotton or embroidery thread
Baker's twine, yarn scraps
Directions:

1) Iron interfacing onto linen scraps.
2) Using a water-soluble pen, draw your designs onto the scraps. Make sure your designs stay near the center of the linen, so you don't lose it in the seam allowance.
3) Using your Perle cotton or embroidery thread, stitch up your designs!
4)Now, trim down your linen to a smaller size. Mine are approx. 5" x 3".
Trim your print fabrics to the same size.
5)Using a small piece of baker's twine or yarn, lay the linen and prints right sides together, with the twine inserted between the layers. There should be a loop between the fabrics, with the ends outside.
6) Stitch around all four edges. Make sure you use a shorter stitch length (I used 1.5) when stitching over the baker's twine! Also, leave a small opening to turn out the tag.
7)Flip the right sides out, clip corners and press.
8)Topstitch, and you're done!
Repeat as desired.
These tags will work for year-round gift-giving and can be personalized to your heart's content!


Thursday, November 1, 2012

HCB: Christmas Plus Pillow Tutorial

This marks the halfway point for the Holiday Craft Bash!

Today, I'm going to share a tutorial for an 18" plus pillow! I recently made one for my friend Rhonda, and decided to make another in reds and greens (and a pop of black!)!

List of materials:

-Sixteen 2.5" strips of different fabrics (at least 15" long; you can use less different fabrics if desired)
-1/2 yard fabric for back
-FQ of light solid (white or off-white) for lining
-20" or 22" zipper
Double-sided fusible tape, similar to Steam-A-Seam 2

Directions:

FRONT

1) Cut 2.5" squares from your strips. Cut five squares from fifteen of the fabrics, and cut six from the last one.
This will give you a total of 81 squares, for a 9 x 9 grid.

2) Find a clean space (this is a job in itself in my sewing room!) that won't be disturbed (by kitties , for instance) and layout your grid.
I like to start in the middle and make one plus, then add additional pluses around it.
You'll need to finish at the outer perimeter, with partial pluses. This takes some time to arrange.
Consider value and color as you do this!
3)Starting with the first row, sew your pieces together with a quarter-inch seam.

I like to sew pairs together, and then blocks.
Be careful not to misplace your pieces!
4)Continue sewing your pieces together, until you have a finished top!
5)Cut an 18.5 x 18.5" piece from your white or off-white solid.
6)With wrong sides together, topstitch (1/8" seam) the edge of the pillow top/white fabric. This is to protect/hide all of those seams!

BACK
6)Cut one 20" x 19" piece from the half yard of fabric, and one 4" x 19" strip from a coordinating fabric (or you can use the same fabric as your 20 x 19" piece).

I'm going to direct you to another tutorial for the pillow back. This is my favorite pillow enclosure, and the tutorial is very well written.

Covered zipper tutorial by Creative Little Daisy

Install your zipper using this tutorial, and then come back! I'll wait.
You should now have a pillow back with a zipper!
7)Finally, with zipper at least halfway open, pin your pillow front and back together (with right sides facing each other).
8)Sew, with 1/2" seam allowance around the perimeter.
Flip inside out, and you're done!

Some HELPFUL TIPS:
*For plus piecing, I prefer to sew my seams open, because it helps me match them better.
*Precise cutting makes for precise piecing!
*I prefer to sew my pieces into blocks, and try to only make one or two long seams. This helps me stay accurate, too. (i.e.-don't sew squares into strips, but "clumps").

As always, make sure you add any finished projects to the Holiday Craft Bash flickr group for a chance at the prizes!
Related Posts with Thumbnails