Pages

Showing posts with label Essex linen. Show all posts

Monday, February 13, 2017

(oldish) FO: Tula 100

FO: Tula 100

When the 100 Modern Quilt Blocks book was released, I thought it would be a fun introduction to sample quilting. I have wanted to make a Farmer's Wife quilt for years, but thought this would be easier.

First three

So, in 2014, I started making blocks.

For 100 Modern Quilt Blocks

I chose my fabrics at the beginning, but then I would select specific fabrics for a handful of blocks at a time. It was a nice way to make progress sporadically, but often months would go by before I would choose for the next set. Enough time passed that I realized I needed to finish the project, as it was starting to be less enjoyable. There was nothing wrong with the block patterns, I think it was just my personal tastes. And honestly, it might also be due to how many projects I work on at a time.

So, somewhere around 55 blocks, I quit.
Which is okay.
Life is too short for projects that don't bring you joy.

A photo posted by Jacey (@jaceynotjc) on

I finished the top at the beginning of 2016 using some Essex yarn-dyed linen in an improvisational fashion. it was really fun to lay the blocks out in groups and I used some strips of fabric from my stash to add interest. I didn't even use all of the blocks in the top (I have a small pile left with an unknown purpose), but it feels good to have it finished and usable. And actually, it's been done since September (or maybe August).

FO: Tula 100

I especially love the back of this one!

FO: Tula 100

Maybe someday, I will try the Farmer's Wife or another sampler quilt. Who knows?

Wednesday, May 28, 2014

A little of this

I'm way behind on sharing projects, but here's a few recent happy makes:

I made this pillow as part of a birthday club. I made some similar ones a few years back. I'm thinking of making another one for my etsy shop. I love the simple patchwork and linen look.

I missed you, embroidery! I stitched this teatowel (using a Sublime Stitching pattern) up for Sara in the wonky bee swap. P.S. She's selling amazing naturally hand-dyed yarns now! Gorgeous.

I'm crazy in love with these paper-pieced treasures. I'm not sure what I will do with them, but I will be making more bits, no question. The apron is by Charise Creates and the mixing bowl is Ayumi's for Superbuzzy.

Here's to a crafty week, friends!

Monday, July 29, 2013

FO: Snap Tote

Do you know Yahaira?
After a few interactions on flickr, I have gotten to know her on Instagram.
She recently put out a call for pattern testers, and I jumped at the chance. The pattern is her just-released Snap Tote (pattern available here on Craftsy).
FO: Snap Tote
And I love it.
I cut this bag out to take on the Wisconsin retreat, and was able to finish it (except for snaps!) very quickly. Jeni was kind of enough to model it for me.
I used a fun vintage-y combination of fabrics, with the lovely Melody Miller flowers, some Architextures lining and Essex Linen.
Interior
I omitted the side pocket, but that gusset pocket is my favorite part of the bag.
I will probably make two on the next bag (and yes, there will be another one). I added snaps to it last week, after purchasing a cheap tool at Joanns.
FO: Snap Tote
If you'd like to make your own version of this bag, I highly recommend the pattern.
And I have one free copy to giveaway! It is a pdf version, so leave ONE comment to enter!
Tell me what summer treat you are craving today!
Me? I am craving a snow cone, coconut flavored.
Please make sure I can contact you to send your pattern!
I'll pick a winner Wednesday.
Thanks to Yahaira for the chance to test the Snap Tote!

Comments are now closed. Thank you!

Monday, June 17, 2013

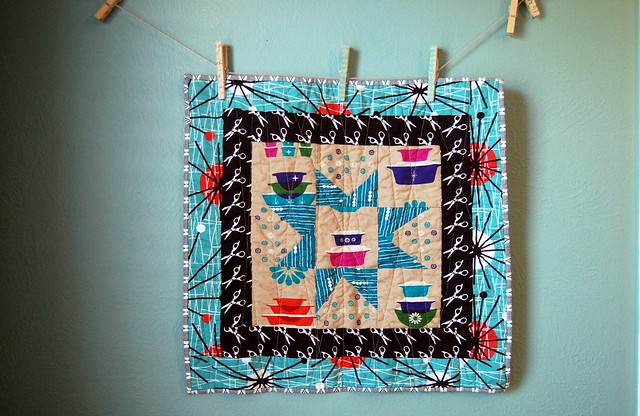
FO: Amanda's Pyrex Mini

My pal Amanda's birthday was last week. Her package from me (and also from Amy arrived just one day late.

FO: Amanda's mini

Along with some yarn, I made her this mini. The Melody Miller pyrex print is one of Amanda's favorites, and she plans to make cafe curtains for her new kitchen with it. I thought she could use a table topper (or wall hanging) that coordinates with her future curtains.

FO: Amanda's mini

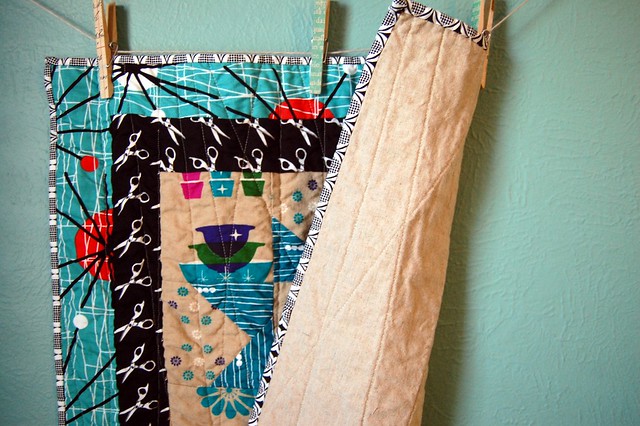
I backed the mini with Essex Linen and quilted with random vertical lines.

I tried to cut the pyrex fabric so that the blocks wouldn't be perfectly fussy-cut, but instead, they would appear as a background to the wonky star.

The mark of a good gift is not wanting to give it, and that definitely applies here.

I also sent Amanda one of these, and kept one for myself. We (along with Jeni) are planning to make the Blossom Pincushion, from I Heart Patchwork, by Rashida Coleman-Hale.

That's all for today! I wish you a happy Monday!

Thursday, November 8, 2012

HCB: Embroidered Gift Tags Tutorial

Well, it's week four of the Holiday Craft Bash!

This week's topic was open for interpretation, and I chose to make a pile of embroidered gift tags! Be sure to check out the adorable Charlie Brown ornaments that Jessica made! You can also make a lovely table topper via Debbie and some super cute Christmas tree coasters over at Meredith's blog! As always, please add any projects you make to the flickr group for a chance at the weekly prize!


List of materials:
Linen scraps (I use Essex linen)
Scraps of fabric
Fusible interfacing (scraps are okay!), I use Pellon SF 101
Water-soluble pen
Perle cotton or embroidery thread
Baker's twine, yarn scraps
Directions:

1) Iron interfacing onto linen scraps.
2) Using a water-soluble pen, draw your designs onto the scraps. Make sure your designs stay near the center of the linen, so you don't lose it in the seam allowance.
3) Using your Perle cotton or embroidery thread, stitch up your designs!
4)Now, trim down your linen to a smaller size. Mine are approx. 5" x 3".
Trim your print fabrics to the same size.
5)Using a small piece of baker's twine or yarn, lay the linen and prints right sides together, with the twine inserted between the layers. There should be a loop between the fabrics, with the ends outside.
6) Stitch around all four edges. Make sure you use a shorter stitch length (I used 1.5) when stitching over the baker's twine! Also, leave a small opening to turn out the tag.
7)Flip the right sides out, clip corners and press.
8)Topstitch, and you're done!
Repeat as desired.
These tags will work for year-round gift-giving and can be personalized to your heart's content!


Monday, July 23, 2012

FOs: For Jessica

Thanks for all your kind words on the wedding photos! I didn't realize I hadn't shared them, but it was fun to look through them again and pick some favorites. I hope you all had fun weekends! E & I went to Austin to visit friends, so it feels like the weekend just flew by.

While I was at the retreat, Jessica mentioned she didn't have a pincushion. This fact, paired with the happy mini she gifted me last year (see below), encouraged me to make her a little gift.

A surprise from Jessica
Isn't the mini lovely?

So, I was tempted to make her a giant, MEGA pincushion, like the one I just made for the Modernista swap, but instead, I used the pincushion organizer pattern from Zakka Style, gifted to each of us at the retreat!

FO: Zakka Style Pincushion

The pincushion is much tinier than the other one I made, but it's so cute! Fabrics used are Dear Stella stars and Essex linen in natural for the cushion. The stamps you see were borrowed from my pal, Amy.

FO: Zakka Style Sewing Kit

Inside, I paired the Dear Stella stars with a favorite Maya print, Maria.

In case Jessica didn't like the organizer, I sweetened the gift with a patchwork basket, made from Ayumi's tutorial.

FO: Patchwork Basket for Jessica

This is my second time to make her patchwork basket, and this time, I just omitted the the exterior patchwork. The basket includes a Moda canvas tape measure print, Joel Dewberry Modern Meadow for the handles and It's a Hoot for the interior.

Both of these patterns are highly recommended for fast and fun gifts!

Related Posts with Thumbnails